
I've been learning Kotlin for Android App development for a few months now. I thought I would make some notes on what I've learned about the basics of app archecture so far. From what I understand, Jetpack Compose as it stands has moved android development - and app development in general - forward by providing more architectural integrity.
What this does is simplifies projects and makes them easier to understand. Assumedly this is because app projects can grow to a size that quickly becomes While I hope this is useful to someone else out there, I mainly wrote it to get these initial concepts straight in my own head.
Once you've been using them for a while, they are highly intuitive and sensible, but in the beginning, it all looks a bit like Greek. Anyway, here it is, an introduction to basic android app architecture in jetpack compose.
Using ViewModels
A ViewModel manages the interaction between the data layer and the UI layer.
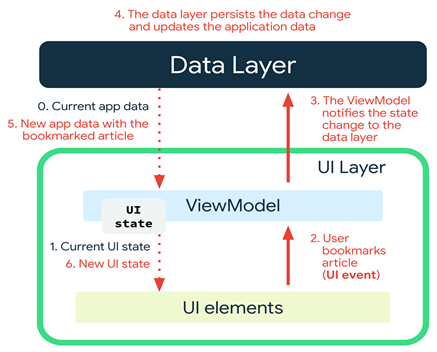
The UI layer comprises the screens we make up with Composables.
So for each screen, we'll need a ViewModel to interact with any data sources (see next section). Think of it like an interface for a UI screen to interact with the data sources that inform them.
Each of our screens will need to interact with our Todo-repository, so the ViewModels will need functions to access this.
Navigation Between Screens
The navigation component consists of three parts:
-
NavController: navigates between destinations (screens)
-
NavGraph: Maps composable destinations to navigate to
-
NavHost: composable acting as container to display current destination of NavGraph
Step 1. Define routes to destinations
A route is a string that defines a destination.
-
Create package 'navigation' and <app>screen.kt file
-
Define Routes. List destination names as short strings, e.g. Main, GoalEdit, PaymentScreen, etc. In <app>screen.kt file:
enum class <app>Screen() {
    Main,
    GoalEdit,
    PaymentScreen
}- Add NavHost.
Initialise navController, e.g. in main App composable:
@Composable
fun InventoryApp(navController: NavHostController = rememberNavController()) {
    InventoryNavHost(navController = navController)
}
Step 2. Add NavHost composable...
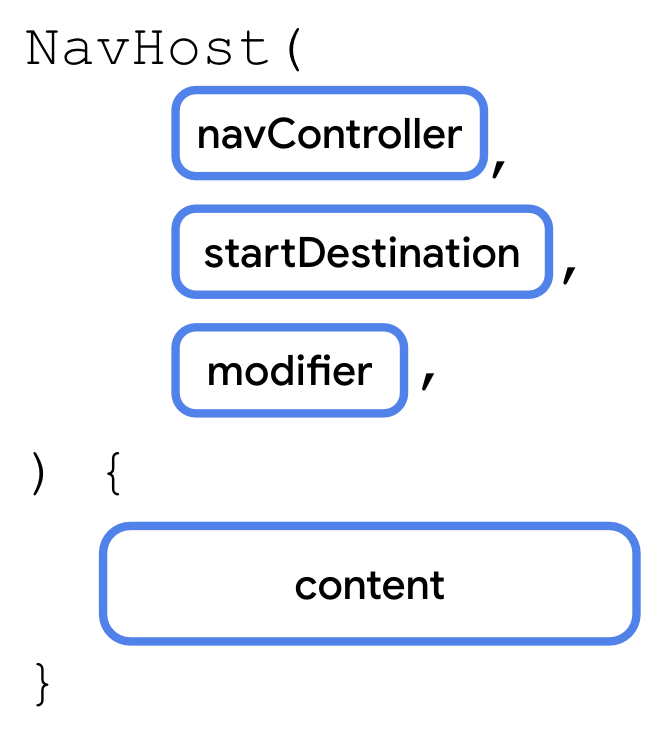
Add some potential routes to the NavHost.
NavHost(navController, VoxPlanScreen.Main.name, modifier = Modifier.padding(10.dp)) {

        composable(route = VoxPlanScreen.Main.name) {

        }
Basic Room functionality
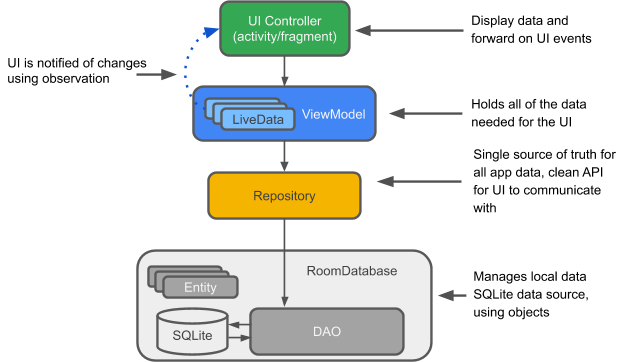
Room allows us to store data in our app.
There are a few components required here:
-
The Database itself. It needs to be created somewhere and once created, our app needs to know how to access it.
-
The Data Access Object (DAO). This is like a translator between Kotlin function names, and database access operations, i.e. reading and writing.
The Repository. The repository is itself like an interface between the ViewModel and the DAO/Database.
Dependency Injection
Once we've created a database and made it workable, we need to protect it against bugs and errors. For example:
-
Making sure only 1 database is created and used
-
Preventing different parts of the app from doing different things to the database at the same time
For this we need to inject the database as a dependency into the places where it's needed, i.e. the ViewModels we are using to manage the interactions between the UI screens we're creating, and the database.
Creating an Application Container & ViewModel Provider
AppContainer: Why?
Creating an App Container class allows you to set up the initialisation of dependencies when the App first starts, and creates a single point of reference. We can then inject the dependencies into their required locations as needed from this single source.
ViewModelProvider: Why?
Creating a View Model Provider Factory centralises the logic for creating View Models throughout the App. It gives us a single point to inject dependencies into our View Models from.
- Create an AppContainer class in your <data> directory. Create an interface which defines the dependencies to inject. Create a class that implements them. Below we are defining a Room database and a repository for that database.
interface AppContainer {
    val database: AppDatabase
    val todoRepository: TodoRepository
}

class AppDataContainer(private val context: Context) : AppContainer {

    override val database: AppDatabase by lazy {
        Room
            .databaseBuilder(context, AppDatabase::class.java, "todo-db")
            .build()
    }

    override val todoRepository: TodoRepository by lazy {
        TodoRepository(database.todoDao())
    }

}
Note we are receiving the Context as an argument.
- Name the application so it knows where to look for its container. In <AndroidManifest.xml>, in the <application> section:
    <application
        android:name=".VoxPlanApplication"
...- Create an <App>Application class that implements Application(). This will enable us to inherit and override the Application's onCreate() function, thereby setting up the container when the App starts:
class VoxPlanApplication: Application() {

    lateinit var container: AppContainer

    override fun onCreate() {
        super.onCreate()
        container = AppDataContainer(this)
    }
}
Note that we are feeding the AppDataContainer class the context (this) of the overall Application, so it can be used e.g. by the Room database (see above).
- Create AppViewModelProvider, and the CreationExtras mapping function.
import android.app.Application
import androidx.lifecycle.ViewModelProvider
import androidx.lifecycle.viewmodel.CreationExtras
import androidx.lifecycle.viewmodel.initializer
import androidx.lifecycle.viewmodel.viewModelFactory
import com.voxplanapp.ui.main.MainViewModel

object AppViewModelProvider {

    val Factory = viewModelFactory {

        initializer {
            MainViewModel(voxPlanApplication().container.todoRepository)
        }
    }
}

fun CreationExtras.voxPlanApplication(): VoxPlanApplication =
    (this[ViewModelProvider.AndroidViewModelFactory.APPLICATION_KEY] as VoxPlanApplication)
Note we are only referencing one ViewModel at the moment, but we will be adding more later.
The extension function voxPlanApplication() creates a link between the Application and the VoxPlanApplication class, allowing us to reference it through the voxPlanApplication() function. It provides a convenient way to access the custom Application class within the ViewModel creation process.
- Initialise the ViewModel as an argument to your Composable screen function, rather than in the function's body:
import androidx.lifecycle.viewmodel.compose.viewModel

fun MainScreen(mainViewModel: MainViewModel = viewModel(factory = AppViewModelProvider.Factory)) {
    ...
}
This will initialise the View Model the first time the Composable is run, without any risk of re-running the same code.
Note: This was the source of an error in my app at first. Because I was initialising the ViewModel inside the Composable function, every time the uiState was updated and the screen was re-composed, it would enter into a loop where the View Model was re-created, then updated again, causing the screen to flicker.
Original code that caused the error:
fun MainScreen(appContainer: AppContainer) {

    val mainViewModel =
        MainViewModel(appContainer.todoRepository, ioDispatcher = Dispatchers.IO)
    ...
}
Flow and StateFlow
A Flow is a data stream that can 'emit' multiple values over time. Useful for exposing data from repositories.
Right now, our Todo Repository is emitting a Flow:
class TodoRepository(private val todoDao: TodoDao) {
    val allTodos: Flow<List<TodoItem>> = todoDao.getAllTodos()
...
}
A StateFlow however is somewhere between a Flow and a State. It emits new states (not just values) and maintains a replay cache, making it ideal for exposing data that needs to be accessed from multiple screens or composables.
Implementing StateFlow:
- Expose data from repository as a StateFlow (change from value to function too)
fun getAllTodosStream() : Flow<List<TodoItem>> = todoDao.getAllTodos()- Provide access to the data as a StateFlow in the ViewModel.
First, create a data class for the StateFlow:
data class MainUiState(val todoList: List<TodoItem> = listOf())Then, use this class to collect a StateFlow in the ViewModel:
class MainViewModel (
    private val repository: TodoRepository,
    private val ioDispatcher: CoroutineDispatcher
) : ViewModel() {
    // this is a StateFlow of items from the repository
    // map wraps each element from repository's Flow<List<TodoItem>> to MainUiState
    // .stateIn maps List of MainUiState to a StateFlow<MainUiState>

    companion object { private const val TIMEOUT_MILLIS = 5_000L }
    val mainUiState: StateFlow<MainUiState> =
        repository.getAllTodosStream().map { MainUiState(it) }
            .stateIn(
                scope = viewModelScope,
                started = SharingStarted.WhileSubscribed(TIMEOUT_MILLIS),
                initialValue = MainUiState()
            )
...
}- Collect the StateFlow in your UI composables
@Composable
fun MainScreen(context: Context, appContainer: AppContainer) {

    val mainViewModel =
        MainViewModel(appContainer.todoRepository, ioDispatcher = Dispatchers.IO)
    val mainUiState by mainViewModel.mainUiState.collectAsState()
...
}
I think that's it for some basic Android App Architecture. Since writing this article I've learned a fair bit more about Kotlin and grown to love it (at the time of writing I wasn't sure still :D). It's a modern language with an intelligent editor (the Jetpack Compose Android Studio) that just seems to make sense.
Bear in mind my original programmer's education was mostly C++ and Java, fantastic languages, of course, but somehow always seemed to be overly complex to my mind.